Imagine a smart home where every device responds instantly, every command is executed flawlessly, and your daily routines flow seamlessly. This is the promise of Z-Wave technology, designed for reliable and low-power communication between your smart devices. However, even the most robust smart home networks can encounter connectivity hiccups, especially when dealing with range limitations. Understanding and addressing these Z-Wave connectivity range issues is crucial for maintaining a responsive and reliable smart home. This comprehensive guide will walk you through the common causes of poor Z-Wave range, effective troubleshooting techniques, and best practices to ensure your smart home operates at its peak performance.
Understanding Z-Wave Technology and Its Range Limitations
Z-Wave is a wireless communication protocol specifically developed for home automation, allowing smart devices to talk to each other. Unlike traditional Wi-Fi networks where devices connect directly to a central router, Z-Wave operates as a mesh network. In this architecture, each powered device in your network acts as a “node” that can both send and receive commands, and also relay signals from other devices. This mesh capability is a significant advantage, as it extends the overall range and reliability of your smart home system by allowing signals to “hop” from one device to another, bypassing obstacles that might otherwise block direct communication to the hub. Z-Wave typically operates in the 800-900 MHz radio frequency band, which offers good penetration through walls and less interference from common Wi-Fi frequencies.
While Z-Wave’s mesh networking inherently extends coverage, individual Z-Wave devices still have their own direct communication range, usually around 30 meters (approximately 100 feet) in open air. Indoors, this range is significantly reduced by obstacles. A Z-Wave network can support up to four signal hops between devices, extending its effective coverage across larger homes, potentially reaching up to 600 feet in ideal conditions. However, the maximum number of devices a single Z-Wave network can manage is typically 232, with the network’s total reach ultimately depending on the number and strategic placement of mains-powered (repeating) devices.
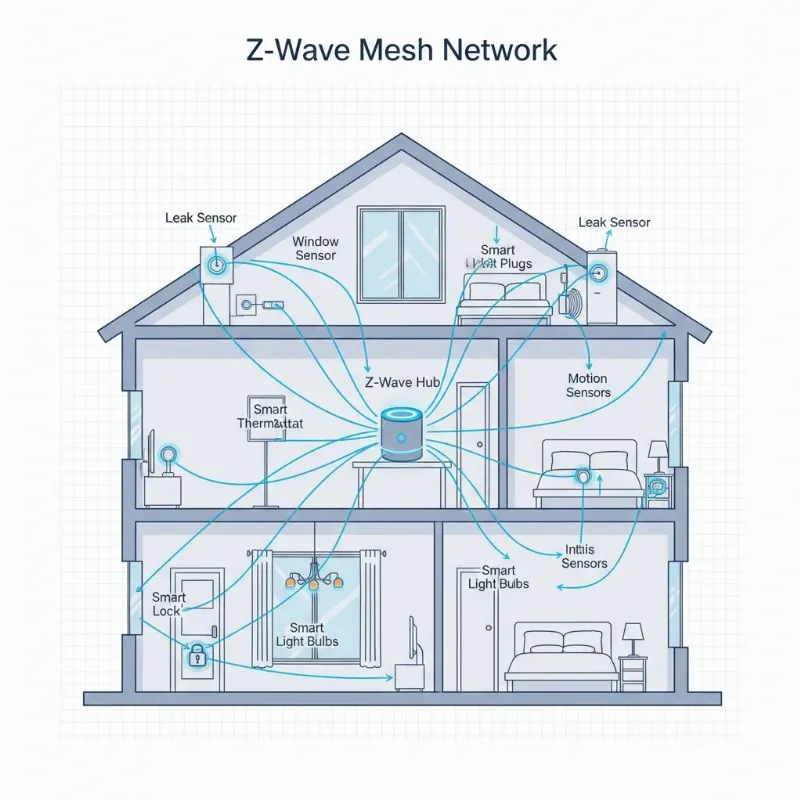 Illustration of a Z-Wave mesh network with devices forming connections to extend signal range throughout a smart home.
Common Causes of Z-Wave Connectivity Range Issues
Many factors can contribute to a weak or unreliable Z-Wave signal, leading to frustrating connectivity issues within your smart home. Identifying these underlying causes is the first step toward a robust and responsive network.
Distance and Physical Obstacles
|
Our Picks for the Best smart locks in 2026
As an Amazon Associate I earn from qualifying purchases.
|
||
| Num | Product | Action |
|---|---|---|
| 1 | Yale Security Assure Lock 2 Deadbolt, Black Suede Keyed Smart Entry Door Lock with Wi-Fi Connected Keypad for Code Entry and Remote Access, YRD410-WF1-BSP |

|
| 2 | Wyze Palm Lock, Smart Door Lock with Palm Vein Recognition, Keyless Entry Smart Locks for Front Door, Keypad, Auto Lock, Dual Battery, Wi-Fi, Works with Alexa & Google, BHMA, IP53, Mechanical Key |
|
| 3 | ULTRALOQ U-Bolt Pro WiFi Smart Lock with Door Sensor, 8-in-1 Keyless Entry Door Lock with Fingerprint ID, App Remote Control, Built-in WiFi Keypad Deadbolt, Auto Unlock, IP65 Waterproof, Easy Install |
|
| 4 | Schlage Encode Smart WiFi Deadbolt Lock for Front Door - Keyless Entry with App or Touchscreen - Works with Alexa, Hey Google, & Airbnb - Create Codes for Guests - Matte Black |
|
| 5 | Schlage Encode Smart WiFi Deadbolt Lock for Front Door - Keyless Entry with App or Touchscreen - Works with Alexa, Hey Google, & Airbnb - Create Codes for Guests - Satin Nickel Silver |
|
| 6 | Wyze Auto-Lock Bolt v2, Fingerprint Keyless Entry Smart Lock, AI Learning Scanner with Wi-Fi Front Door Lock Deadbolt, Auto-Lock, 8 Months Battery, BHMA2, IP53, Anti-Peep Keypad, Backup Keys |
|
| 7 | Smart Door Handle Lock with Keypad: Yamiry Fingerprint Smart Knob - Keyless Entry Digital Lock for Front Door - Deadbolt with APP - Generate Passcode Remotely - DIY Installation |
|
| 8 | Smart Door Lock with Camera Fingerprint Keyless Entry Door Lock Electronic Deadbolt with Keypad Code, App Remote Control, Auto Unlock for Front Door |
|
| 9 | TEEHO TE001 Keyless Entry Door Lock with Keypad - Smart Deadbolt Lock for Front Door with 2 Keys - Auto Lock - Easy Installation - Matte Black |
|
| 10 | Tapo Smart Wi-Fi Deadbolt Door Lock – Keyless Tactile Buttons, Customized Access with in-App Monitoring, Auto-Lock, IP54 Weatherproof, BHMA Grade 3, Compatible with Standard Door Sizes, Tapo DL100 |
|
The most obvious factor affecting Z-Wave range is distance. While Z-Wave is designed for indoor use, its radio waves can be significantly attenuated by physical barriers. Thick walls made of brick, tile, concrete, or those containing rebar mesh will block signals far more effectively than standard wooden studs and drywall. Even large household appliances like refrigerators, washing machines, or big-screen TVs can act as significant signal obstructions or reflectors, reducing the effective range by 25-30% per obstacle. Metallic surfaces, such as exposed ductwork or metal garage doors, are particularly notorious for absorbing or reflecting Z-Wave signals unexpectedly, creating dead zones.
Electromagnetic Interference
Z-Wave devices operate on specific low radio frequencies, typically around 908 MHz in the U.S. and Canada. This makes them susceptible to interference from other wireless devices operating on similar frequencies. Common culprits include cordless landline telephones, baby monitors, ham radios, wireless speakers, and even larger or older microwave ovens. Old cellular phones or weather stations can also emit signals that disrupt Z-Wave communication. When multiple devices transmit on the same or very similar frequencies, it can lead to signal congestion and communication errors, causing your Z-Wave devices to become unresponsive or appear offline.
Network Configuration and Device Placement
The physical arrangement of your Z-Wave devices and controller plays a critical role in network performance. If your Z-Wave hub or controller is not centrally located, devices at the edges of your home might struggle to maintain a strong connection. Battery-powered Z-Wave devices, while convenient, do not act as repeaters and therefore cannot help extend your network’s range. This means that if a battery-powered sensor is far from the hub and also far from any mains-powered Z-Wave device, it will likely experience connectivity problems. A sparse network with too few mains-powered devices can leave large gaps in coverage, preventing signals from effectively hopping across your home.
Outdated Firmware and Network Health
Just like any other technology, Z-Wave devices and controllers rely on firmware to function correctly. Outdated firmware can sometimes contain bugs or lack optimizations that improve signal reliability and device compatibility. Furthermore, a Z-Wave network can experience “congestion” if there are too many communication retries or if a single problematic device (a “ghost” device or a constantly failing node) is dragging down overall network stability. These issues can manifest as delayed commands, missed updates, or devices appearing to be offline intermittently.
Low Battery Levels
It might seem simple, but low battery levels are a frequent cause of Z-Wave communication failures. Many Z-Wave sensors and smaller devices operate on batteries, and as battery power diminishes, the device’s ability to transmit or receive signals reliably can drastically decrease. Devices with critically low batteries may drop off the network entirely, leading to a sudden loss of functionality for specific smart home elements. Always keep an eye on battery status indicators within your Z-Wave controller’s interface.
Diagnosing Z-Wave Range Problems
Before you can effectively fix Z-Wave connectivity issues, you need to understand where the problems lie. A systematic approach to diagnosis can save you time and frustration.
Monitoring Signal Strength (RSSI)
Many Z-Wave hubs and advanced smart home platforms offer diagnostic tools that display the Received Signal Strength Indicator (RSSI) for each device in your network. RSSI is a crucial metric, typically measured in dBm (decibels per milliwatt), indicating the strength of the signal a device is receiving.
A strong and stable connection generally falls within the -60 dBm to -75 dBm range, ensuring low packet loss and reliable communication. A fair signal between -76 dBm and -85 dBm might show occasional delays or retries, while anything below -85 dBm indicates a poor or non-existent connection, leading to frequent errors and unresponsiveness. Regularly checking these values can pinpoint weak spots in your network that need attention.
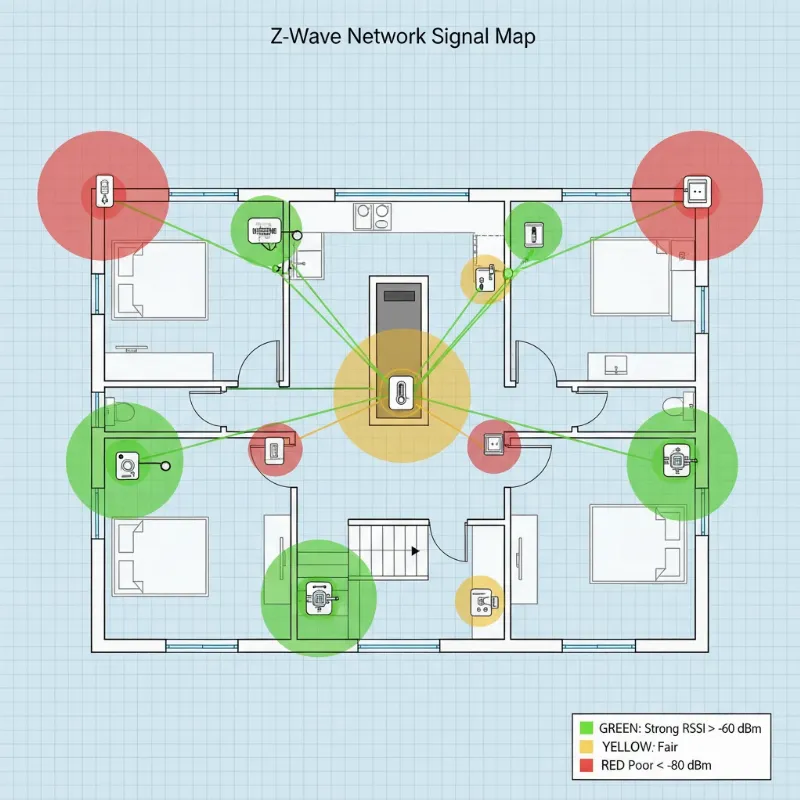 A conceptual diagram showing Z-Wave signal strength indicators in a home layout, highlighting weak and strong signal areas.
Identifying Problematic Devices
Inconsistent device behavior is a tell-tale sign of connectivity issues. If a specific light switch responds intermittently, a door lock frequently reports incorrect status, or a sensor constantly goes offline, these are strong indicators of a localized range problem. Your Z-Wave controller’s logs can also be invaluable, often showing communication errors, failed transmissions, or retry patterns for specific devices. By correlating these log entries with the physical location of the devices and their RSSI values, you can narrow down the potential sources of trouble. Sometimes, a single failing node can cause network congestion and impact other devices, making its identification critical.
Effective Solutions for Z-Wave Range Improvement
Once you’ve diagnosed the likely causes, implementing the right solutions can dramatically improve your Z-Wave network’s performance and reliability.
Optimizing Network Layout and Controller Placement
The placement of your Z-Wave hub is paramount. Ideally, it should be in a central location within your home, minimizing the distance to the majority of your devices. Avoid placing it in basements, corners, or inside metal enclosures that can obstruct its signal. Ensure it’s not directly next to other wireless transmitters like Wi-Fi routers, as this can create localized interference. Sometimes, simply moving your hub a few feet can make a noticeable difference. Experiment with different orientations if your hub has external antennas.
Strategic Use of Z-Wave Repeaters and Extenders
Z-Wave’s mesh network thrives on mains-powered devices, as these automatically act as repeaters, forwarding signals to extend the network’s reach. If you have battery-powered devices in remote areas, or if certain areas of your home experience weak signals, strategically adding more AC-powered devices is often the most effective solution. These can be smart plugs, light switches, or dedicated Z-Wave range extenders.
Place repeaters roughly midway between your Z-Wave hub and the device experiencing connectivity issues. A general rule of thumb is to have a repeater approximately every 30 feet, especially if there are walls or obstacles in between. When adding new repeaters, ensure they are included in your network starting with those closest to the hub, and then gradually moving outwards. This allows the network to build optimal routing paths. After adding or relocating devices, always run a “network heal” or “Z-Wave repair” function on your hub to allow the network to re-map its routes and incorporate the new repeaters.
Mitigating Interference
To reduce electromagnetic interference, identify and relocate any devices that operate on the same 900 MHz frequency band as Z-Wave. This might include moving a cordless phone base station, a baby monitor, or a wireless speaker away from your Z-Wave hub and devices. If certain large appliances or metallic surfaces are causing dead zones, try repositioning your Z-Wave devices or adding a repeater to route the signal around the obstruction. In some cases, shielding devices (though rarely necessary) or turning off interfering electronics temporarily can help diagnose the source of the problem.
Ensuring Up-to-Date Firmware
Regularly checking for and applying firmware updates to both your Z-Wave hub and individual devices is a good practice. Manufacturers often release updates that include bug fixes, performance enhancements, and improved signal stability. While firmware updates do not change the fundamental operating frequency of a Z-Wave device, they can optimize how the device handles signals and communicates within the network. Be aware that Z-Wave firmware updates can sometimes be a lengthy process, and it’s always wise to review release notes and user experiences before updating, as some users prefer the “if it ain’t broke, don’t fix it” approach for stable systems.
Device Reset and Network Healing
If a specific device remains unresponsive despite other troubleshooting efforts, try a full device reset. This usually involves removing its battery (if applicable) for a few minutes and then reinserting it, or performing a factory reset according to the manufacturer’s instructions. After resetting, exclude the device from your network and then re-include it, ideally in its intended final location or close to a strong repeater. Following any device re-inclusion or major network changes, running a “network heal” or “rediscovery” process on your Z-Wave controller is essential. This command forces the hub to rebuild the routing table, ensuring that devices find the most efficient communication paths.
Addressing Specific Device Issues
Some Z-Wave devices have unique requirements. For instance, Z-Wave door locks often require a security-compatible (encryption-capable) Z-Wave device within close proximity to relay their encrypted signals. If your door lock is experiencing issues, ensure there is a mains-powered Z-Wave device that supports secure communication placed strategically nearby. For devices that constantly drop off the network, consider their battery health, their distance to the nearest repeater, and any potential localized interference.
“A well-optimized Z-Wave network isn’t just about adding more devices; it’s about intelligent placement and understanding how each component interacts to create a resilient, self-healing mesh.”
Table: Common Z-Wave Connectivity Issues and Quick Fixes
| Issue | Potential Cause | Quick Fix |
|---|---|---|
| Device unresponsive / offline | Out of range, interference, low battery | Relocate device closer to hub/repeater, add a range extender, check/replace batteries, move interfering electronics away. |
| Commands delayed / inconsistent | Network congestion, weak signal, bad routing | Add more mains-powered repeaters, perform a network heal, check for and remove “ghost” devices, update firmware. |
| Device fails to include | Out of range during pairing, device fault | Bring device very close to the hub for inclusion, factory reset the device, ensure the hub is in inclusion mode. |
| Erratic behavior / false reports | Interference, faulty device, loose wiring | Identify and isolate sources of interference, perform a factory reset, check physical connections, consider device replacement if issues persist. |
| Low signal strength (RSSI) | Distance, physical obstacles | Introduce repeaters between the device and hub, reposition the device to avoid obstructions like thick walls or large appliances. |
Best Practices for a Robust Z-Wave Network
Building a reliable Z-Wave network goes beyond just fixing problems; it involves proactive planning and maintenance.
Plan Your Network Carefully
Before deploying many devices, map out your home. Identify areas where Z-Wave coverage might be weak (e.g., garages, basements, far corners). Plan to place your hub centrally and strategically position mains-powered devices to act as repeaters, creating a strong mesh backbone. Remember that devices closest to the hub should be added first, allowing the network to expand outwards.
Regular Maintenance
Periodically check the battery status of your Z-Wave devices, setting up alerts through your smart home platform if possible. Keep an eye on firmware updates for both your hub and devices, applying them when they offer significant improvements or bug fixes. Performing a “network heal” command on your hub every few months, or after making significant changes to your network layout, can help maintain optimal routing paths.
Understanding Your Home Environment
Every home is unique, and factors like construction materials, layout, and nearby electronics will affect Z-Wave performance. Take time to observe your network’s behavior and learn how different areas of your home impact signal strength. Don’t be afraid to experiment with device placement to find the sweet spots.
The Future of Z-Wave: Innovations in Range and Reliability
The landscape of smart home technology is constantly evolving, and Z-Wave is no exception. Recent advancements, particularly with Z-Wave Long Range (ZWLR) technology, promise to address traditional range limitations more effectively. ZWLR boasts a significantly increased transmission range, potentially up to 1.5 miles in open air, and enhanced penetration through walls. This dramatic improvement is achieved through higher transmit power and the use of spread spectrum modulation, which spreads energy across a wider carrier frequency compared to the narrower band used by standard Z-Wave.
This innovation opens up new possibilities for larger homes, multi-building properties, and even smart communities, allowing for seamless connectivity over vast distances. To leverage ZWLR, your Z-Wave hub must support this newer specification. While ZWLR devices can typically be paired as traditional Z-Wave Plus devices, an ZWLR-enabled hub is required to build a true Z-Wave Long Range network and unlock its full potential for unparalleled connectivity. As more systems integrate ZWLR functionality, smart home users can look forward to even more reliable and expansive networks with fewer connectivity concerns.
Conclusion
A well-functioning Z-Wave network is the backbone of an efficient smart home, bringing convenience, security, and energy savings to your daily life. While Z-Wave connectivity range issues can occasionally arise, they are almost always solvable with a systematic approach to troubleshooting. By understanding the fundamentals of Z-Wave’s mesh network, identifying common culprits like distance, interference, and improper device placement, and applying targeted solutions such as adding repeaters, optimizing layouts, and ensuring up-to-date firmware, you can transform your smart home experience. Don’t let connectivity frustrations hold you back; embrace these strategies to build a robust and responsive Z-Wave network that reliably serves your smart home needs.
Are you experiencing persistent Z-Wave range issues, or are you looking to expand your smart home’s reach with the latest Z-Wave Long Range technology?
Frequently Asked Questions
Is Z-Wave more reliable than Wi-Fi for smart home devices?
Z-Wave is often considered more reliable for smart home devices due to its mesh networking architecture and operation on a less congested frequency band compared to Wi-Fi. It’s designed for low-power, short data packet transmission, which translates to fewer interference issues and more consistent communication for critical devices like sensors and locks. Wi-Fi, while faster for data-intensive tasks, can be more prone to congestion and drops with numerous devices.
How many Z-Wave repeaters do I need?
The number of Z-Wave repeaters needed depends on your home’s size, layout, and construction materials. A good rule of thumb is to ensure that every Z-Wave device is within 15-25 feet of another AC-powered Z-Wave device (which acts as a repeater). In complex layouts or homes with thick walls, you might need a repeater every 30 feet. Always start with mains-powered devices closer to your hub and build outwards, then use your hub’s diagnostic tools to check signal strength.
Can thick walls really block Z-Wave signals?
Yes, thick walls, especially those made of concrete, brick, or containing metal elements like rebar, can significantly attenuate or block Z-Wave signals. Each major obstruction can reduce the signal’s effective range by 25-30%. Lighter materials like drywall have less impact. Strategic placement of repeaters and your Z-Wave hub becomes crucial in homes with dense construction to route signals around or through such barriers.
Does Z-Wave interfere with Wi-Fi?
Generally, Z-Wave does not significantly interfere with Wi-Fi because they operate on different radio frequencies. Z-Wave typically uses the 800-900 MHz band, while Wi-Fi uses 2.4 GHz and 5 GHz bands. While it’s always good practice to keep Z-Wave hubs and Wi-Fi routers a few feet apart to avoid any minor electromagnetic overlap, direct interference is rare due to this frequency separation.
Should I update my Z-Wave device firmware regularly?
Updating Z-Wave device firmware is generally recommended if the updates address specific bugs, improve performance, or introduce new features you want. However, it’s not always critical like security updates for internet-connected devices, as Z-Wave devices typically don’t directly connect to the internet. Always review the manufacturer’s release notes and proceed with caution, as updates can sometimes be lengthy or, rarely, introduce new quirks.