Upgrading your home security, replacing a worn-out lock, or simply giving your door a fresh look often involves removing an old deadbolt. While it might seem daunting to dismantle a security device without causing unsightly damage, the process is straightforward with the right approach and tools. This guide will walk you through each step, ensuring you can safely remove your old deadbolt while preserving your door’s integrity.
Dealing with a stubborn deadbolt can test anyone’s patience, but approaching it systematically is key to a smooth, damage-free removal. Whether you’re a seasoned DIY enthusiast or a newcomer to home improvement, understanding the components and techniques involved will make this task manageable. We’ll cover everything from gathering your tools to tackling tricky situations like hidden or tamper-proof screws.
Why Remove an Old Deadbolt?
There are numerous reasons homeowners decide to remove an existing deadbolt. Perhaps you’re upgrading to a more advanced smart lock system, or your current deadbolt is malfunctioning, sticking, or simply worn out. Aesthetic considerations also play a role; a new door finish might necessitate a different style of lock, or you might be replacing a damaged deadbolt after a break-in attempt. Whatever the motivation, a proper removal process is essential to avoid unnecessary repairs or damage to your door.
Tools You’ll Need for Deadbolt Removal
Before you begin, gathering the correct tools will ensure a smooth process and help prevent any accidental damage. Most standard deadbolt removals require only a few basic items, though some specialized locks might demand additional tools.
You will typically need:
- Phillips Head Screwdriver: This is the most commonly used tool for deadbolt screws.
- Flathead Screwdriver: Useful for prying off decorative covers or in some cases, for specific screw types.
- Magnetic Screwdriver (Recommended): A magnetic tip prevents small screws from falling into the door cavity or onto the floor, which can be frustrating to retrieve.
- Allen Wrench Set: Many modern or high-security deadbolts feature hidden set screws, often accessible with a small Allen wrench.
- Small Pry Tool or Pick Tool: For carefully dislodging decorative rosettes or covers that conceal screws.
- Spray Lubricant (e.g., WD-40 or Graphite Spray): If your deadbolt is old, rusty, or stuck, a little lubricant can significantly ease the removal of components.
- Utility Knife (Optional): To score around the faceplates if paint has sealed them to the door, preventing chipping.
- Clean Cloth: For wiping away dust or lubricant.
- Touch-up Paint or Shoe Polish (Optional): For minor scratches that may occur despite careful handling.
Having these tools readily available saves time and reduces frustration, allowing you to focus on the task at hand rather than scrambling for the right instrument.
 A collection of essential tools for removing a deadbolt, including screwdrivers, Allen wrench set, and lubricant.
Understanding Your Deadbolt’s Components
Before delving into the removal steps, it’s helpful to understand the basic parts of a deadbolt. Knowing what each component does will make the disassembly process more intuitive.
A standard deadbolt typically consists of:
- Interior Faceplate/Thumbturn Assembly: This is the part on the inside of your door, often with a thumb-turn knob or another key cylinder, and where you’ll typically find the visible mounting screws.
- Exterior Faceplate/Key Cylinder: Located on the outside of the door, this is where the key is inserted. It usually slides out once the interior assembly is removed.
- Through-Bolts: These are the screws that pass through the interior assembly, through the door, and into the exterior key cylinder, holding the two sides together.
- Deadbolt Latch/Bolt: This is the cylindrical metal piece that extends from the edge of the door into the door frame when the lock is engaged, securing the door.
- Set Plate/Faceplate on Door Edge: The metal plate surrounding the bolt on the door’s edge. It’s secured by small screws to the door itself.
- Tailpiece/Cam Bar: A small metal piece that connects the interior and exterior mechanisms, allowing them to operate the bolt.
Familiarizing yourself with these parts simplifies the process, enabling you to anticipate each step and handle the deadbolt with greater confidence.
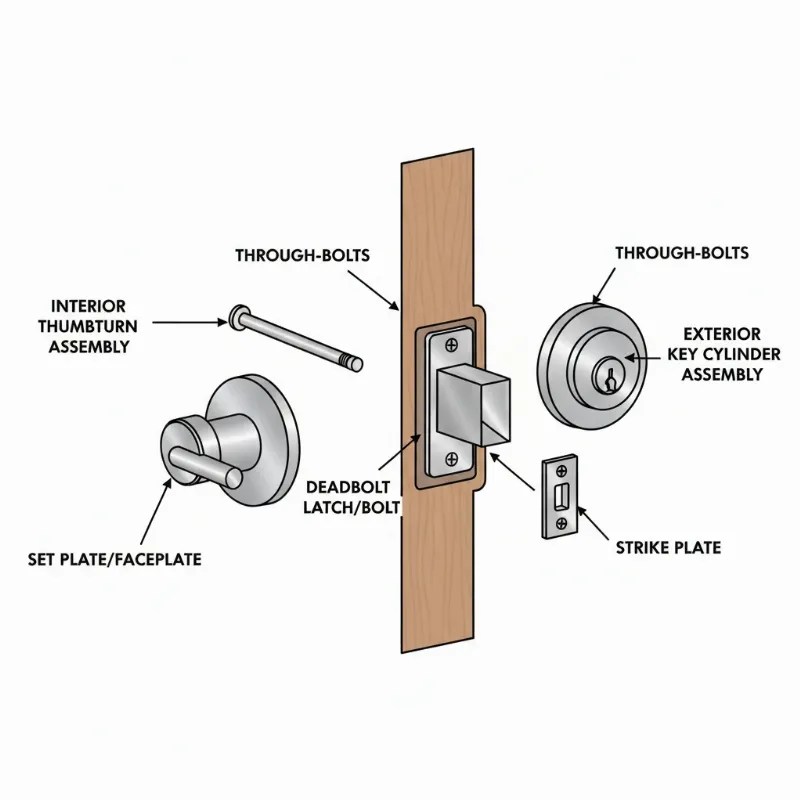 Diagram illustrating the main components of a standard deadbolt, including interior and exterior faceplates, bolt, and through-bolts.
Step-by-Step Guide to Removing a Deadbolt
Removing a deadbolt can be a quick and easy DIY project with the right guidance. Follow these steps carefully to ensure a smooth, damage-free removal.
Preparation
|
Our Picks for the Best smart locks in 2026
As an Amazon Associate I earn from qualifying purchases.
|
||
| Num | Product | Action |
|---|---|---|
| 1 | Tapo Smart Wi-Fi Deadbolt Door Lock – Keyless Tactile Buttons, Customized Access with in-App Monitoring, Auto-Lock, IP54 Weatherproof, BHMA Grade 3, Compatible with Standard Door Sizes, Tapo DL100 |

|
| 2 | Smart Door Lock with Camera Fingerprint Keyless Entry Door Lock Electronic Deadbolt with Keypad Code, App Remote Control, Auto Unlock for Front Door |
|
| 3 | Wyze Auto-Lock Bolt v2, Fingerprint Keyless Entry Smart Lock, AI Learning Scanner with Wi-Fi Front Door Lock Deadbolt, Auto-Lock, 8 Months Battery, BHMA2, IP53, Anti-Peep Keypad, Backup Keys |
|
| 4 | Schlage Encode Smart WiFi Deadbolt Lock for Front Door - Keyless Entry with App or Touchscreen - Works with Alexa, Hey Google, & Airbnb - Create Codes for Guests - Matte Black |
|
| 5 | Wyze Palm Lock, Smart Door Lock with Palm Vein Recognition, Keyless Entry Smart Locks for Front Door, Keypad, Auto Lock, Dual Battery, Wi-Fi, Works with Alexa & Google, BHMA, IP53, Mechanical Key |
|
| 6 | Smart Door Handle Lock with Keypad: Yamiry Fingerprint Smart Knob - Keyless Entry Digital Lock for Front Door - Deadbolt with APP - Generate Passcode Remotely - DIY Installation |
|
| 7 | TEEHO TE001 Keyless Entry Door Lock with Keypad - Smart Deadbolt Lock for Front Door with 2 Keys - Auto Lock - Easy Installation - Matte Black |
|
| 8 | Yale Security Assure Lock 2 Deadbolt, Black Suede Keyed Smart Entry Door Lock with Wi-Fi Connected Keypad for Code Entry and Remote Access, YRD410-WF1-BSP |
|
| 9 | ULTRALOQ U-Bolt Pro WiFi Smart Lock with Door Sensor, 8-in-1 Keyless Entry Door Lock with Fingerprint ID, App Remote Control, Built-in WiFi Keypad Deadbolt, Auto Unlock, IP65 Waterproof, Easy Install |
|
| 10 | Schlage Encode Smart WiFi Deadbolt Lock for Front Door - Keyless Entry with App or Touchscreen - Works with Alexa, Hey Google, & Airbnb - Create Codes for Guests - Satin Nickel Silver |
|
Begin by ensuring your workspace is clear and safe. Open the door and secure it in place to prevent it from swinging or closing unexpectedly during the removal process. If the deadbolt is stuck or stiff, apply a small amount of spray lubricant to the keyway and the bolt mechanism. Allow it to penetrate for a few minutes before proceeding. This can make turning the key and disengaging the bolt easier.
Locating and Removing Visible Screws
Most deadbolts have two visible screws on the interior faceplate. These are typically Phillips head screws that pass through the door to secure the entire lock assembly. Using your magnetic Phillips head screwdriver, carefully unscrew these. It’s crucial to apply steady pressure to avoid stripping the screw heads. Once loosened, gently pull out the screws, ensuring they don’t drop inside the door. Keep them in a safe place, as you may need them if you’re reinstalling the same lock or using them as a reference.
Dealing with Hidden Screws and Rosettes
Some modern or high-security deadbolts feature hidden screws for a cleaner aesthetic or enhanced security. If you don’t see any screws on the interior faceplate, examine the trim ring, also known as the rosette, or the thumb-turn assembly. Many designs conceal screws beneath a decorative cover or a thumb-turn cap. Look for a small notch or a tiny hole on the edge of the rosette. You might need to use a small flathead screwdriver or a poke tool to gently pry off this cover or access a recessed Allen head set screw. Once the cover is off, the mounting screws or Allen screws should be visible. Use the appropriate Allen wrench to loosen and remove them.
Detaching the Interior and Exterior Faceplates
After removing all screws from the interior side, the interior faceplate should come loose. Gently pull it away from the door. If it’s a bit stiff, a slight twisting motion (often counter-clockwise) might help to free it. Once the interior assembly is off, the exterior key cylinder will usually slide out from the other side of the door. Be careful when pulling both parts away to prevent chipping the door’s paint or finish. Ensure no parts fall inside the door cavity.
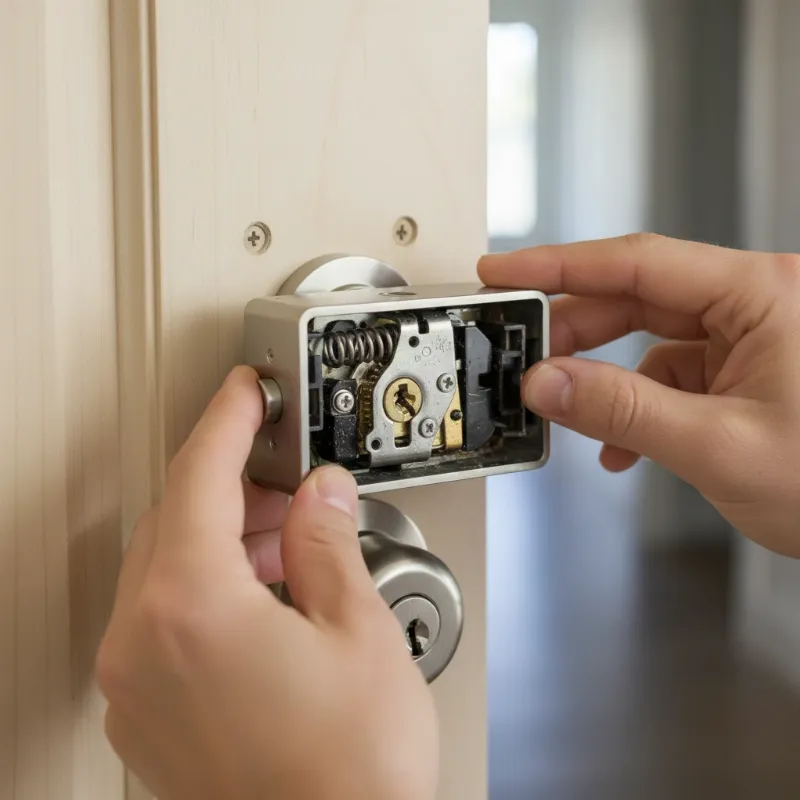 Hands carefully detaching the interior faceplate of a deadbolt from a wooden door after screws have been removed.
Removing the Latch/Set Plate and Bolt
With the main assemblies removed, turn your attention to the edge of the door. You’ll see a metal plate, known as the set plate or latch faceplate, where the deadbolt extends. This plate is typically secured by two smaller Phillips head screws. Unscrew these, being careful not to strip them. Once these screws are removed, the deadbolt latch mechanism, including the bolt itself, can be pulled straight out of the door’s edge. In some designs, the bolt and set plate are one piece, while in others, they may be separate. If the bolt is stuck in the locked position, you may need to use a flathead screwdriver to gently twist the internal mechanism and retract the bolt before removal.
“Removing a deadbolt is not just about unscrewing parts; it’s about understanding the delicate interplay of components to ensure both security and the preservation of your door’s aesthetic.”
Tips for Avoiding Door Damage
Preventing damage to your door during deadbolt removal is paramount. By taking a few extra precautions, you can ensure the process leaves your door looking pristine.
- Work Slowly and Deliberately: Rushing is the quickest way to cause scrapes or dings. Take your time with each screw and component.
- Use the Right Tools: Always match your screwdriver bit to the screw head precisely to avoid stripping. Magnetic screwdrivers are invaluable for preventing dropped screws that can scratch surfaces.
- Gentle Prying: When separating faceplates or decorative covers, use a soft tool or a thin, flat blade wrapped in tape to avoid marring the door’s finish. Apply gentle, even pressure.
- Lubricate Stubborn Parts: For old, stiff, or rusty deadbolts, a spray lubricant can loosen components without force, reducing the risk of damage.
- Score Paint Lines: If your door has been painted with the deadbolt installed, the paint may have sealed the faceplates to the door. Use a utility knife to lightly score along the edges of the faceplates before prying them off. This prevents large chunks of paint from chipping away.
- Protect the Door Surface: If you need to apply more force, place a protective cloth or a thin piece of wood between your tool and the door surface.
- Clean and Touch Up: After removal, clean any residue from the door. Minor scratches can often be buffed out or touched up with a matching paint pen or shoe polish.
By following these tips, you can maintain your door’s finish and avoid costly repairs.
Common Issues and Troubleshooting
Even with careful planning, you might encounter some common challenges when removing an old deadbolt. Knowing how to address these issues can save you time and frustration.
Screws Won’t Budge or Are Stripped
If screws are stuck or have stripped heads, do not force them. For stuck screws, try applying more lubricant and letting it sit for a while. For stripped screws, a screw extractor tool is your best friend. This specialized bit can grip the damaged screw head and allow you to remove it. In extreme cases, if you don’t plan to reuse the deadbolt and absolutely cannot remove the screws, a Dremel tool with a cut-off wheel can be used to carefully cut a new slot in the screw head for a flathead screwdriver, or even to cut the screw head off entirely. Always protect your door surface when using power tools.
Hidden Screws Remain Elusive
If you’ve checked for notches and holes around the rosette and still can’t find hidden screws, some deadbolts might have tamper-resistant screws that don’t look like typical Phillips or flatheads. These might require specific security bits or an Allen wrench. Consult the manufacturer’s manual if available, or search online for your specific deadbolt model. Sometimes, the decorative collar around the cylinder needs to be twisted or compressed to reveal the screws underneath.
Deadbolt is Stuck in the Frame (Locked Door)
If the deadbolt is stuck in the locked position and you need to remove it while the door is closed, this presents a significant challenge. If the door isn’t aligned, try gently lifting or pushing the door at the handle to relieve pressure on the bolt, then try to turn the key or thumbturn. If the bolt mechanism itself is jammed, you might need to insert a strong, flathead screwdriver into the square hole where the tailpiece connects to the bolt and attempt to manually retract it. If all else fails, calling a locksmith is the safest option to avoid damaging both the deadbolt and the door frame.
What Comes Next? Installing a New Lock or Repairing the Door
Once the old deadbolt is successfully removed, you have a clean slate. If you’re installing a new deadbolt, measure the existing holes for the backset, cross bore, and door thickness to ensure a perfect fit. This prevents you from having to modify the door further. Clean the area thoroughly, removing any dust, paint chips, or old grease. If there are any minor imperfections, now is the time to fill them with wood putty and touch up the paint before installing the new lock. Replacing a deadbolt is often a mirrored process of its removal, making it a manageable task once the old one is out.
Conclusion
Removing an old deadbolt without damaging your door is a rewarding home improvement project that enhances both security and aesthetics. By meticulously following these steps, from gathering the right tools to carefully disassembling each component, you can achieve a professional-looking result. Remember that patience and precision are your most valuable assets throughout this process. Whether you’re upgrading to a state-of-the-art smart lock or simply replacing a faulty mechanism, a careful approach ensures your door remains pristine and ready for its next security enhancement.
Ready to enhance your home’s security and curb appeal? Taking the time to properly remove your old deadbolt is the first crucial step.
Frequently Asked Questions
Is it always possible to remove a deadbolt without damaging the door?
Yes, in most cases, it is possible to remove a deadbolt without causing damage to the door itself. The key is to use the correct tools, follow the steps patiently, and be gentle when separating components. Issues typically arise when excessive force is used or if the wrong tools are applied, leading to stripped screws or scratched surfaces. Careful preparation and attention to detail are crucial for a damage-free outcome.
What if my deadbolt has no visible screws?
If your deadbolt has no visible screws, they are likely hidden beneath a decorative cover or rosette. Examine the edge of the interior faceplate or the thumb-turn for a small notch or hole. You can often use a small flathead screwdriver or a pick tool to gently pry off this cover, revealing the mounting screws or a recessed Allen head set screw underneath. Many modern deadbolts are designed this way for a cleaner look.