Has your smart lock handle or knob started to wobble, making your door feel less secure and potentially impacting its performance? A loose smart lock can be more than just an annoyance; it can compromise the very security and convenience you invested in. Don’t let a wobbly handle diminish your smart home experience. This guide, brought to you by an experienced smart lock technician, will walk you through diagnosing and fixing a loose smart lock handle or knob, restoring both your peace of mind and your home’s robust security.
What Makes Your Smart Lock Handle or Knob Loose?
Understanding the root cause of a loose smart lock handle or knob is the first step toward a lasting fix. Several factors can contribute to this common issue, ranging from simple wear and tear to installation oversights.
Common Causes
- Loose Mounting Screws: This is perhaps the most frequent culprit. Over time, with constant use, the screws that hold the smart lock’s interior and exterior components together can naturally loosen. This can include screws securing the handle to the door or internal set screws on the spindle.
- Improper Installation: If the smart lock wasn’t installed correctly from the beginning, issues might surface later. This could involve misaligned spindle holes, incorrectly placed spacers, or hex screws not being tightened sufficiently during the initial setup. A handle might feel crooked or come off unexpectedly if installation steps were missed.
- Wear and Tear: Like any mechanical device, smart locks and their components are subject to wear. Constant pulling, turning, and exposure to environmental factors can cause parts like the spindle, springs, or internal mechanisms to degrade, leading to play in the handle or knob.
- Overuse of Force: Repeatedly applying excessive force when operating the handle or knob can accelerate wear on the internal components and loosen the fastening screws.
- Manufacturing Defects or Component Malfunctions: In rare cases, a loose handle might stem from a defect in the lock’s manufacturing or a malfunction within its internal locking system.
|
Our Picks for the Best smart locks in 2026
As an Amazon Associate I earn from qualifying purchases.
|
||
| Num | Product | Action |
|---|---|---|
| 1 | Wyze Auto-Lock Bolt v2, Fingerprint Keyless Entry Smart Lock, AI Learning Scanner with Wi-Fi Front Door Lock Deadbolt, Auto-Lock, 8 Months Battery, BHMA2, IP53, Anti-Peep Keypad, Backup Keys |

|
| 2 | Tapo Smart Wi-Fi Deadbolt Door Lock – Keyless Tactile Buttons, Customized Access with in-App Monitoring, Auto-Lock, IP54 Weatherproof, BHMA Grade 3, Compatible with Standard Door Sizes, Tapo DL100 |
|
| 3 | TEEHO TE001 Keyless Entry Door Lock with Keypad - Smart Deadbolt Lock for Front Door with 2 Keys - Auto Lock - Easy Installation - Matte Black |
|
| 4 | Yale Security Assure Lock 2 Deadbolt, Black Suede Keyed Smart Entry Door Lock with Wi-Fi Connected Keypad for Code Entry and Remote Access, YRD410-WF1-BSP |
|
| 5 | Schlage Encode Smart WiFi Deadbolt Lock for Front Door - Keyless Entry with App or Touchscreen - Works with Alexa, Hey Google, & Airbnb - Create Codes for Guests - Matte Black |
|
| 6 | ULTRALOQ U-Bolt Pro WiFi Smart Lock with Door Sensor, 8-in-1 Keyless Entry Door Lock with Fingerprint ID, App Remote Control, Built-in WiFi Keypad Deadbolt, Auto Unlock, IP65 Waterproof, Easy Install |
|
| 7 | Smart Door Handle Lock with Keypad: Yamiry Fingerprint Smart Knob - Keyless Entry Digital Lock for Front Door - Deadbolt with APP - Generate Passcode Remotely - DIY Installation |
|
| 8 | Smart Door Lock with Camera Fingerprint Keyless Entry Door Lock Electronic Deadbolt with Keypad Code, App Remote Control, Auto Unlock for Front Door |
|
| 9 | Schlage Encode Smart WiFi Deadbolt Lock for Front Door - Keyless Entry with App or Touchscreen - Works with Alexa, Hey Google, & Airbnb - Create Codes for Guests - Satin Nickel Silver |
|
| 10 | Wyze Palm Lock, Smart Door Lock with Palm Vein Recognition, Keyless Entry Smart Locks for Front Door, Keypad, Auto Lock, Dual Battery, Wi-Fi, Works with Alexa & Google, BHMA, IP53, Mechanical Key |
|
Essential Tools for the Job
Before you begin, gather the necessary tools. Having them on hand will streamline the repair process.
- Screwdrivers: You’ll likely need both Phillips-head and flathead screwdrivers.
- Allen Wrench / Hex Key Set: Many smart locks use hex screws, particularly for securing handles to the spindle. A set with various sizes is advisable.
- Threadlocker (Optional but Recommended): Products like Loctite can prevent screws from loosening again due to vibrations or repeated use.
- Soft Cloth: Useful for cleaning and protecting surfaces.
- Pliers: May be helpful for gripping or adjusting small components.
Step-by-Step Guide to Fixing a Loose Smart Lock Handle or Knob
Repairing a loose smart lock handle or knob is often a straightforward DIY task. Follow these steps carefully to tighten your lock and restore its stability.
Step 1: Prepare Your Workspace and Ensure Safety
Start by ensuring the smart lock is in a safe state. If your smart lock has easily removable batteries, consider taking them out to prevent accidental locking or engagement during the repair. Lay down a soft cloth to protect your door and components.
Step 2: Diagnose the Specific Problem
Gently jiggle the handle or knob to determine where the looseness originates. Does the handle itself wobble? Is the entire interior or exterior unit shifting on the door? Does it struggle to return to its horizontal position after being pressed? This diagnosis will guide your repair efforts.
Step 3: Address Visible Loose Screws
This is the most common fix.
- Remove the Cover Plate: Many smart locks have an interior cover plate or escutcheon that conceals the mounting screws. Carefully remove this, usually by unscrewing small screws on the side or bottom, or by rotating and pulling it off.
- Locate and Tighten Mounting Screws: With the cover plate off, you’ll typically see two long mounting screws that pass through the door and connect the exterior and interior lock components. Use the appropriate screwdriver to tighten these screws. Tighten them until they are snug, but be careful not to overtighten, as this can strip the threads or warp the lock’s housing.
- Check for Set Screws: Some handles or knobs are secured to a central spindle by a small set screw, often located on the underside of the handle neck or knob stem. Use an Allen wrench (hex key) to tighten this screw.
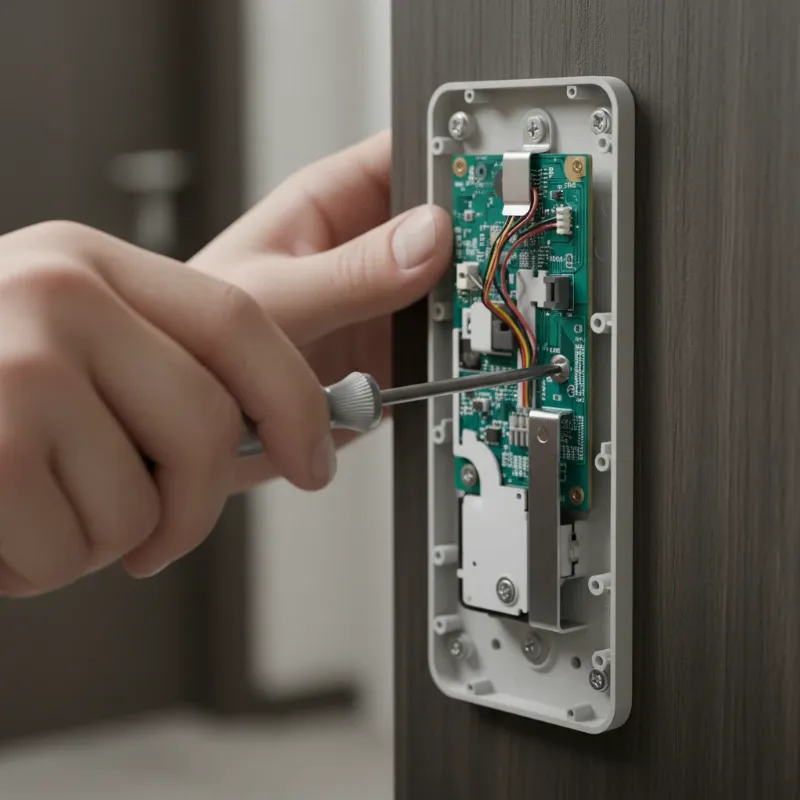 A close-up of a hand using a Phillips-head screwdriver to tighten mounting screws on the interior unit of a smart door lock, with the cover plate removed.
Step 4: Inspect the Spindle and Spacers
For handles that attach directly to a spindle, ensure proper alignment and secure fitting.
- Check Plastic Spacers: Some smart locks use plastic spacers around the spindle to ensure a snug fit and smooth operation. Confirm these are correctly positioned and not damaged.
- Tighten Spindle Hex Screws: If your handle attaches to a spindle with a hex screw, tighten this screw firmly. This screw locks the handle onto the spindle, preventing rotational play.
Step 5: Dealing with Hidden Fasteners (Manufacturer-Specific)
Some smart lock brands, like Kwikset, Yale, or Schlage, may feature hidden release tabs or levers to conceal mounting screws or allow for handle removal.
- Locate Release Mechanism: Refer to your smart lock’s manual. Typically, there’s a small hole on the underside of the handle or neck where you can insert a small Allen wrench or paperclip to depress a release tab. Once released, the handle or decorative trim (often called the “rose”) can be removed to expose the underlying screws.
- Tighten and Reassemble: Tighten any exposed screws, then carefully reassemble the components, ensuring the release mechanism re-engages correctly.
Step 6: Apply Threadlocker (Optional)
If your smart lock handle frequently loosens despite tightening, consider applying a small drop of removable threadlocker to the screw threads before tightening them. This will help prevent them from vibrating loose again. Ensure you use a removable type of threadlocker so you can disassemble the lock in the future if needed.
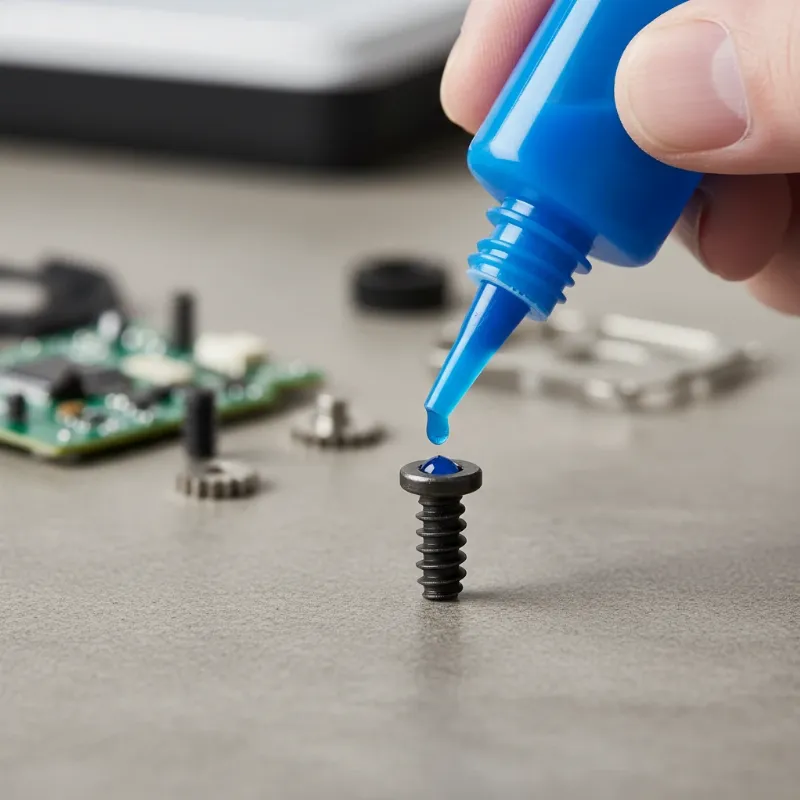 A small bottle of blue threadlocker being applied to the screw threads of a smart lock component, with a hand holding the screw.
Step 7: Test and Reassemble
Once all screws are tightened, test the handle or knob’s operation. It should feel firm and operate smoothly. Before fully reassembling, ensure the lock engages and disengages properly, both manually and via its smart functions. Finally, replace any cover plates or trim pieces you removed.
When to Call a Professional Locksmith
While many loose smart lock issues can be resolved with DIY efforts, some situations warrant professional assistance.
- Stripped Screw Holes: If the screw holes are stripped, the screws won’t hold securely, and a DIY fix might not be sufficient. A locksmith can often repair or reinforce these holes.
- Damaged Internal Mechanisms: If the looseness persists after tightening all visible fasteners, or if you suspect internal damage (e.g., a broken spring or spindle), a professional can diagnose and replace faulty components.
- Persistent Looseness: If the handle or knob repeatedly becomes loose, it might indicate a deeper issue with the lock’s design, wear, or the door itself.
- Lack of Confidence: If you’re unsure about any step or uncomfortable disassembling your smart lock, it’s always best to consult a professional to avoid further damage.
Preventing Future Looseness in Your Smart Lock
Proactive measures can significantly extend the life and stability of your smart lock.
- Regular Maintenance Checks: Make it a habit to check your smart lock handles and knobs periodically (e.g., every 6-12 months) for any signs of looseness. A quick tighten can prevent major issues.
- Proper Installation: If installing a new smart lock, strictly follow the manufacturer’s instructions. Double-check measurements, alignment, and screw tightness during the installation process.
- Avoid Excessive Force: Educate family members on using the smart lock gently. Avoid pulling or twisting the handle with unnecessary force.
- Consider Higher Quality Hardware: If your current lock is consistently failing due to wear, consider upgrading to a more robust model from a reputable brand known for durability.
Conclusion
A loose smart lock handle or knob is a common issue that, fortunately, often has a simple fix. By understanding the causes, having the right tools, and following a few straightforward steps, you can quickly restore the stability and security of your smart lock. Regular maintenance and careful use are key to preventing future problems and ensuring your smart lock continues to provide reliable convenience and peace of mind for years to come. Don’t let a wobbly handle compromise your home’s security; empower yourself with the knowledge to keep your smart lock functioning perfectly.
Frequently Asked Questions
Is a loose smart lock handle a security risk?
Yes, a loose smart lock handle or knob can be a security risk. While the internal locking mechanism might still be intact, excessive play can indicate a compromised installation or worn components, potentially making the lock easier to bypass or less reliable in its operation. It’s crucial to address looseness promptly to maintain optimal security.
How often should I check my smart lock for looseness?
It’s a good practice to check your smart lock handles and knobs for any looseness at least twice a year, perhaps when you change batteries or adjust for seasonal changes. For high-traffic doors, more frequent checks (e.g., quarterly) might be beneficial to catch issues early.
Can I use super glue to fix a loose smart lock handle?
No, you should not use super glue or any permanent adhesive to fix a loose smart lock handle. This can permanently bond components, making future repairs, battery replacements, or full lock replacement impossible without damaging the door or the lock. Always opt for mechanical tightening or removable threadlocker.
What if my smart lock’s handle is loose immediately after installation?
If your smart lock handle is loose immediately after installation, it’s likely due to an installation error. Revisit the manufacturer’s installation guide, paying close attention to spindle alignment, spacer placement, and the tightening of all mounting and set screws. Ensure all components are correctly seated before tightening.
Will fixing a loose handle affect my smart lock’s electronic functions?
In most cases, tightening a loose mechanical handle or knob will not negatively affect your smart lock’s electronic functions. In fact, ensuring the mechanical components are secure and properly aligned can improve the overall performance and longevity of the electronic parts by reducing strain and ensuring smooth operation of the latch and bolt.