Are you tired of fumbling for keys or constantly worrying about the security of your home? Imagine a world where your door unlocks with a touch, a voice command, or simply as you approach. Smart locks offer this unparalleled convenience and enhanced security, transforming how you interact with your home’s entry points. Many believe installing these high-tech devices requires a professional, but with the right guidance, a DIY smart lock installation can be a straightforward process, often completed in as little as 15 minutes. As an Admin at SmartLocksPro.com with over a decade of experience in smart lock technology, I’m here to demystify the process and help you unlock a smarter, safer lifestyle.
Smart Locks: Understanding the Basics Before You Begin
Before you grab your tools, it’s helpful to understand what a smart lock is and how it functions. Essentially, a smart lock is an electromechanical lock designed to perform locking and unlocking operations on a door when it receives instructions from an authorized device using a wireless protocol and a cryptographic key. Most smart locks are designed to replace standard deadbolts, fitting into existing door preparations, making DIY installation surprisingly accessible. Common types include Bluetooth-enabled, Wi-Fi connected, keypad entry, and even fingerprint-activated locks. Regardless of the specific technology, their primary goal is to provide keyless access and remote control, integrating seamlessly into modern living.
Why DIY Smart Lock Installation is Easier Than You Think
The thought of tackling a home improvement project like installing a new lock can feel daunting, but installing a smart lock is often far simpler than many anticipate. Manufacturers have increasingly prioritized user-friendly designs, ensuring that most installations require only basic tools and a step-by-step approach. By choosing to install your smart lock yourself, you not only save money on professional installation fees but also gain an immediate sense of accomplishment and control over your home’s security. It’s a quick, impactful upgrade that empowers you to enhance your home’s safety and convenience on your own terms.
Essential Tools and Preparations for Your Smart Lock Installation
Successful smart lock installation begins with proper preparation. Fortunately, you won’t need an extensive toolkit for most standard installations.
Here’s what you’ll typically need:
- Phillips Head Screwdriver: This is the primary tool for removing your old deadbolt and securing the new smart lock components.
- Measuring Tape (Optional but Recommended): Useful for double-checking door dimensions like thickness, backset, and borehole diameter to ensure compatibility.
- Pencil (Optional): Handy for marking the door if any adjustments are needed, though usually not required for a direct deadbolt replacement.
Before you begin, a quick pre-installation checklist can save time and prevent headaches:
- Check Your Door’s Compatibility: Most smart locks fit standard doors with thicknesses between 1 3/8 inches and 2 inches.
- Measure Your Backset: This is the distance from the edge of the door to the center of the bore hole (where the lock cylinder is). Standard backsets are 2 3/8 inches or 2 3/4 inches. Your new smart lock’s latch should be adjustable to match.
- Confirm Borehole Diameter: The round opening where the lock body sits should ideally be 2 1/8 inches.
- Gather All Components: Unbox your new smart lock and ensure all parts—exterior keypad/assembly, interior assembly, latch/deadbolt, strike plate, and screws—are present according to the manufacturer’s instructions.
- Safety First: Ensure the door is closed and secure during installation to prevent accidental movement.
“A well-prepared DIYer is already halfway to a successful smart lock installation. Confirming compatibility and having the right tools on hand eliminates most potential frustrations.”
Step-by-Step Guide: Installing Your Smart Lock in 15 Minutes
Ready to get started? This guide focuses on replacing a standard deadbolt, a common and quick installation process.
Step 1: Remove Your Old Deadbolt
|
Our Picks for the Best smart locks in 2026
As an Amazon Associate I earn from qualifying purchases.
|
||
| Num | Product | Action |
|---|---|---|
| 1 | Schlage Encode Smart WiFi Deadbolt Lock for Front Door - Keyless Entry with App or Touchscreen - Works with Alexa, Hey Google, & Airbnb - Create Codes for Guests - Satin Nickel Silver |

|
| 2 | Smart Door Lock with Camera Fingerprint Keyless Entry Door Lock Electronic Deadbolt with Keypad Code, App Remote Control, Auto Unlock for Front Door |
|
| 3 | TEEHO TE001 Keyless Entry Door Lock with Keypad - Smart Deadbolt Lock for Front Door with 2 Keys - Auto Lock - Easy Installation - Matte Black |
|
| 4 | Tapo Smart Wi-Fi Deadbolt Door Lock – Keyless Tactile Buttons, Customized Access with in-App Monitoring, Auto-Lock, IP54 Weatherproof, BHMA Grade 3, Compatible with Standard Door Sizes, Tapo DL100 |
|
| 5 | Wyze Palm Lock, Smart Door Lock with Palm Vein Recognition, Keyless Entry Smart Locks for Front Door, Keypad, Auto Lock, Dual Battery, Wi-Fi, Works with Alexa & Google, BHMA, IP53, Mechanical Key |
|
| 6 | ULTRALOQ U-Bolt Pro WiFi Smart Lock with Door Sensor, 8-in-1 Keyless Entry Door Lock with Fingerprint ID, App Remote Control, Built-in WiFi Keypad Deadbolt, Auto Unlock, IP65 Waterproof, Easy Install |
|
| 7 | Schlage Encode Smart WiFi Deadbolt Lock for Front Door - Keyless Entry with App or Touchscreen - Works with Alexa, Hey Google, & Airbnb - Create Codes for Guests - Matte Black |
|
| 8 | Smart Door Handle Lock with Keypad: Yamiry Fingerprint Smart Knob - Keyless Entry Digital Lock for Front Door - Deadbolt with APP - Generate Passcode Remotely - DIY Installation |
|
| 9 | Yale Security Assure Lock 2 Deadbolt, Black Suede Keyed Smart Entry Door Lock with Wi-Fi Connected Keypad for Code Entry and Remote Access, YRD410-WF1-BSP |
|
| 10 | Wyze Auto-Lock Bolt v2, Fingerprint Keyless Entry Smart Lock, AI Learning Scanner with Wi-Fi Front Door Lock Deadbolt, Auto-Lock, 8 Months Battery, BHMA2, IP53, Anti-Peep Keypad, Backup Keys |
|
Begin by unscrewing and detaching your existing deadbolt and its latch mechanism. On the interior side of your door, locate the two screws holding the deadbolt assembly in place. Use your Phillips head screwdriver to loosen and remove them. Once the screws are out, the interior and exterior halves of the deadbolt will slide free. Next, remove the latch from the edge of the door by unscrewing its small faceplate screws. Finally, remove the strike plate from the door frame. With your old hardware gone, the door is now ready for its smart upgrade.
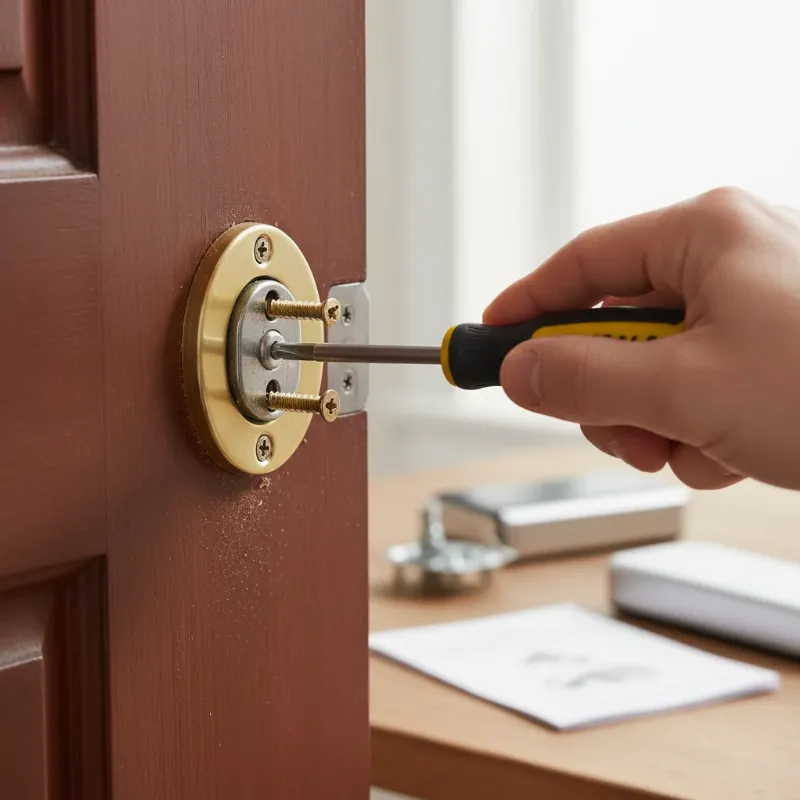 A hand unscrewing an old deadbolt from a wooden door with a Phillips head screwdriver, focusing on the DIY process of smart lock installation.
Step 2: Install the New Latch Mechanism
Take the new smart lock’s latch or deadbolt and slide it into the opening on the edge of the door. Ensure the slanted side of the bolt faces the direction the door closes. If your smart lock’s latch is adjustable for different backsets, adjust it to match your door’s measurement (either 2 3/8 inches or 2 3/4 inches). Once it sits evenly with the surface of the door edge, secure it firmly using the screws provided by the manufacturer. A properly aligned latch is crucial for the lock’s smooth operation.
Step 3: Attach the Exterior Keypad/Assembly
Carefully feed the cable attached to the exterior keypad or touchscreen assembly through the bore hole so it reaches the inside of the door. Position the exterior part of the smart lock on the outside surface of the door, ensuring it is level and straight. From the inside of the door, insert the long mounting screws that pass through the interior mounting plate and connect to the exterior assembly. Tighten these screws carefully, ensuring the exterior unit feels secure but not overly tight, as overtightening can potentially damage internal electronics.
Step 4: Secure the Interior Mounting Plate
Once the exterior assembly is in place, position the interior mounting plate over the deadbolt mechanism on the inside of the door. This plate often helps align the interior and exterior components and provides a secure base. Use the provided screws to fasten the mounting plate to the door, ensuring it’s snug and doesn’t wiggle. Double-check that any cables from the exterior unit are routed correctly through the plate.
Step 5: Connect the Interior Assembly and Battery Pack
Bring the main interior assembly of the smart lock to the inside of the door. Connect the cable from the exterior keypad to the designated port on the circuit board of the interior unit. Align the tailpiece (the small metal bar that extends from the deadbolt) so it slides directly into the rotating mechanism of the interior assembly. Gently place the interior housing over the mounting plate and secure it with the remaining screws. Finally, insert the required batteries (usually AA) into the battery pack and close the battery cover.
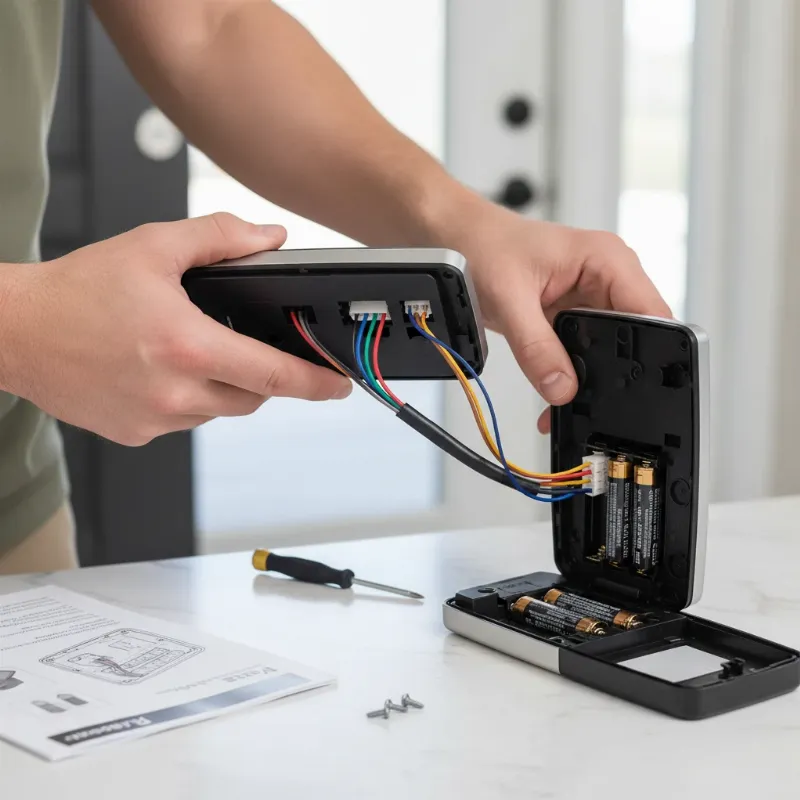 A hand connecting the cable of a smart lock's interior assembly to the exterior unit, with batteries being inserted into the battery pack as part of a DIY installation.
Step 6: Test and Calibrate Your Smart Lock
After completing the physical installation, it’s time to test your new smart lock. Most smart locks will automatically run a short calibration sequence once powered on. Wait for this process to complete. Then, manually test the lock by turning the thumb-turn from the inside; the deadbolt should extend and retract smoothly without resistance. Next, download the manufacturer’s companion app on your smartphone. Follow the app’s instructions to pair your phone with the lock (often via Bluetooth or Wi-Fi), initiate any final calibration, and set up your initial access codes, fingerprints, or digital keys. Test these features to confirm full functionality.
Troubleshooting Common Smart Lock Installation Issues
Even with a straightforward guide, minor hiccups can occur. Here are some common issues and their quick fixes:
- Lock is Sticky or Won’t Lock/Unlock Smoothly: This is typically an alignment issue. Check that the latch and the strike plate on the door frame line up perfectly. Loosen the strike plate screws, adjust its position slightly, and retighten. Ensure your door closes fully, as a slight gap or warped frame can prevent smooth operation.
- Keypad Isn’t Responding: The most common cause is low or dead batteries. Replace them with a fresh set, ensuring they are inserted correctly. If the issue persists, perform a soft reset of the lock (refer to your manual) or clean the keypad surface, as dust or moisture can interfere with touch sensitivity.
- Lock Won’t Pair with App/Smart Home System: Connectivity issues are usually the culprit. Ensure your phone’s Bluetooth or Wi-Fi is on and you’re using the latest version of the lock’s app. Restart both your phone and the lock. If it still refuses to connect, try resetting the lock to factory settings and repeating the pairing process. Moving closer to your Wi-Fi router or ensuring a strong signal can often resolve the problem.
- Door Body Moves After Installation: If the door feels loose after installation, it might indicate that the door seam is too large or the bolt hole in the door frame is oversized. You might need to adjust the strike plate or add shims to ensure the deadbolt enters the hole securely and stably.
Maintaining Your Smart Lock for Optimal Performance
Once installed, a little routine maintenance goes a long way in ensuring your smart lock provides long-lasting security and convenience. Regularly replace the batteries (typically every 6-12 months, or as indicated by the app’s low-battery warnings) to prevent unexpected lockouts. Keep the exterior keypad and components clean by wiping them with a soft, dry cloth to remove dust and grime. Finally, always keep your smart lock’s firmware updated through its companion app. These updates often include important security patches and performance enhancements, ensuring your lock remains protected against new threats and operates at its best.
The Future of Smart Lock Integration in Your Smart Home
The evolution of smart locks continues at a rapid pace, promising even greater integration and intelligence. We’re already seeing smart locks with advanced AI capabilities for more precise access control and predictive security. Future trends include deeper connectivity with other smart home devices, allowing for intricate automation routines—imagine your doors locking automatically when your security system is armed, or unlocking when a specific voice command is given. Blockchain technology is even being explored to enhance the security and privacy of access logs, making smart locks an increasingly sophisticated and indispensable component of a fully connected, secure home.
Conclusion
Installing a smart lock might seem like a complex task, but as we’ve explored, it’s a perfectly achievable DIY project that can be completed in minutes with just a few basic tools. From removing your old deadbolt to setting up advanced smart features, the process is designed for homeowner convenience. By embracing smart locks, you gain unparalleled security, flexible access management, and the sheer convenience of a keyless lifestyle, all contributing to a more modern and safer home environment. Don’t let hesitation stand between you and the effortless security that smart locks provide. Are you ready to upgrade your home’s entry and experience the future of door security today? Explore our range of smart lock solutions at SmartLocksPro.com and take the first step towards a smarter, more secure home!
Frequently Asked Questions
Is installing a smart lock difficult for a beginner?
No, installing most smart locks is surprisingly straightforward for beginners. Many models are designed to replace existing deadbolts using only a Phillips head screwdriver and clear, step-by-step instructions. With basic DIY skills and patience, you can typically complete the installation in under an hour, often in as little as 15 minutes.
What tools do I need to install a smart lock?
For most standard smart lock installations, you’ll primarily need a Phillips head screwdriver. A measuring tape and a pencil can also be helpful for checking door dimensions and marking if necessary, but specialized tools are generally not required, making it an accessible DIY project.
How long does it usually take to install a smart lock?
The actual installation time for a smart lock can vary, but for a standard deadbolt replacement on a pre-drilled door, many users report completing the process in as little as 15 to 30 minutes. This doesn’t include the initial app setup and configuration, which typically adds another 5-10 minutes.
Can I install a smart lock on any door?
Most smart locks are designed to fit standard residential doors that have a pre-drilled bore hole for a deadbolt. Key compatibility factors include door thickness (typically 1 3/8 to 2 inches) and backset measurement (2 3/8 or 2 3/4 inches). Mortise locks or doors with non-standard preparations may require professional installation.
What should I do if my smart lock isn’t working after installation?
If your smart lock isn’t working, first check the batteries and ensure they are inserted correctly. Next, verify that all wiring connections are secure and that the lock components are properly aligned and not binding. If issues persist, consult the manufacturer’s troubleshooting guide or contact their customer support for assistance.